How to add textures to an aircraft model.


Q:  I just downloaded a 3rd party repaint and it's just the textures, no plane!  What do I do?

A:  Adding a repaint to an existing plane is pretty easy, just follow these instructions:


Hopefully, the repainter put the textures into a folder named "texture.x" (where "x" is the airline name), if not you will have to do that.

You will also have to have the aia aircraft to use with the new texture already in your FS 2002\aircraft directory.


add this folder
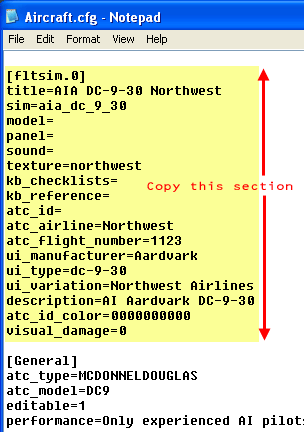
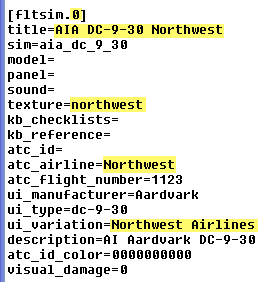
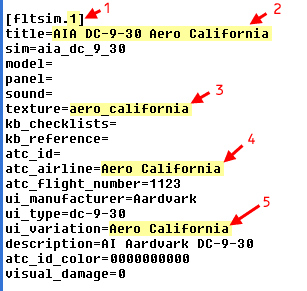
For example, if you downloaded an Aero California repaint of the aardvark dc-9-30 that only included textures, you'll have to have an aardvark dc-9-30 to use the textures with.  If you don't already have one, you'll have to install one.  For this example, we'll assume you already have the AI Aardvark Northwest Airlines DC-9-30 in your aircraft directory.


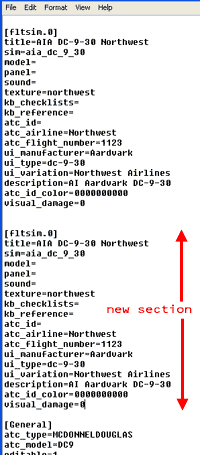
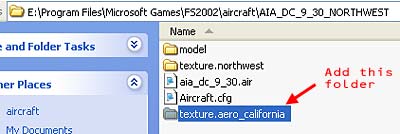
Go to the "AIA_DC_9_30_NORTHWEST" folder (located in your FS2002\aircraft folder) and open it up.  Inside, create a folder named "texture.aero_california ".  Now place your downloaded textures into this folder.


Now that we have the textures in the right place, we need to to add an entry for this new plane to the "Aircraft.cfg" file.  The "Aircraft.cfg " is simply a text document containing performance parameters as well as important information about the aircraft.
this is the cfg


Open up the "Aircraft.cfg" file using notepad.  At the very top, you will see a section of text that looks like this:  this is the section that tells FS the type of plane, airline, ATC callsign, and which texture to use.


copy this part


Select and copy this entire section, and then paste it in directly below the original section,  Now we have two identical entries, so we need to change the second one so that it will be our new Aero California dc-9.

paste it in


cfg highlighted
In the section we just pasted in, we'll need to change the highlighted entries for our new plane.

1) [fltsim.0], change this to [fltsim.1], if you add additional dc-9-30 repaints, they will be [fltsim.2], [fltsim.3], etc.

2) title=, change this to any name you like

3) texture=, the name of the texture folder we created.

4) atc_airline=, the call sign that ATC will use (if MS provided it).  Not all call signs are obvious, British Airways call sign is "Speedbird" for instance.

5) ui_variation=, the airline name that will appear in the FS aircraft selection window.


cfg changed


Save the .cfg file and now you should have your new plane available in FS as well as for AI flights if you assign it to some flight plans.


You may have figured out from reading this, that you can consolidate a lot of your airlines that use the same model into a single folder, just by adding additional texture.x folders and adding  [fltsim.x] entries into the aircraft.cfg.